
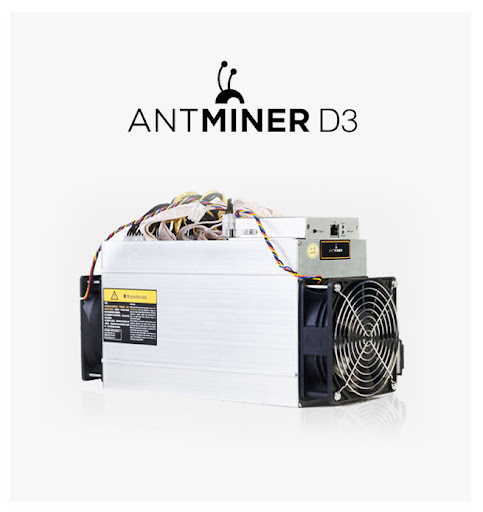
D3 Specifications
1) Miner dimension (cm): 32 x 13.1 x 18
2) 2 fans, front fan spinning at 6000 rpm and rear fan spinning at 4300 rpm
3) 3 pieces of hash board
4) 10 power connectors. 3 on each hash board, 1 on control board
5) Ethernet connection: Use a RJ45 connector without the WiFi function
6) Package dimension (cm): 43.5 x 21.5 x 30.5
7) Net weight: 4.1 kg, gross weight 4.75 kg, volumetric weight: 6 kg
8) One IP Report button, one Reset button and one SD card slot
9) The 2 x 9 ribbon cables are sized 2.0 mm x 185 mm
10) Surrounding conditions: 0 to 40 degree Celsius, 5% RH – 95% RH, no condensation allowed
11) ASIC chip type: BM 1760
12) Number of ASIC chips: 60 chips on each hash board, total 180 chips
13) Power consumption: 970 W ± 7% (APW3++ PSU has AC/DC 93% efficiency at 25 degree Celsius)
14) Power: APW3+ & APW3++ can support one unit of D3
15) Noise level: 76 dB
16) Voltage input: 11.6 V to 13.0 V
17) Fault light beams when a miner error is detected and a normal green light indicates miner is operating normally
Things to prepare before use
– Register at a mining pool, we recommend Antpool.
– Use a DHCP network, do not filter by a MAC address, and set a DHCP limit.
– Power card must be 10 A and above, 1.5 m or shorter.
– It is recommend to use a power supply offering 200 W more than the miner’s power requirement.
– Ensure electrical supply and power socket are certified.
– There must be sufficient Ethernet connectors on the router to correspond to the number of the miners. If not sufficient, please get a new router.
– Feel free to use any type of network cables, the length depends on the distance between the router and miners.
– Use PC that supports Windows 7 640-bit or better.
– PoE is not supported.
– Supported browsers: Google Chrome and Firefox.
Using the miner
1. Inspect the miner for aesthetic damage. Look at the corners of the miner and check for dents and cracks. Look out for loose heat sinks, broken fan blades, cables, and bent connectors. If you noticed a damage or defect, contact customer support immediately.
2. Make sure all connectors and cables are plugged in securely before powering the miner up.
3. Power up the miner and wait for the normal (green) light to start flashing before searching for the miner’s IP address.
Then download the IP search software here: https://service.bitmain.com/support/download and look for IP Reporter
a. Open the IP search software, press start
b. Press the “IP Report” button on the miner
c. The miner’s IP address will be shown
Note: Miner and computer must be on the same network to communicate.

4. Enter the miner’s IP address into the supported browser. A dialog box will pop up which requires you to enter the login credentials; both username and password are “root”.

5. Press the “Network” tab and choose “Static” from the Protocol dropdown list. Key in the IP address, subnet mask, SWG, DNS, then click “Save&Apply”.
You may wish to keep a copy of the IP address by putting sticky note on the miner.

6. Press the “Miner Configuration” tab and then “General Settings” to setup the mining pools. Key in the mining pool URL and miner name (under Worker).
There is no need to change the Password. Then click “Save&Apply” to connect to the mining pools.
If you would like to group or differentiate your miners, you could use the Worker field to name miners with IP address together under a sub account.
E.g. Using a sub account name – fhq + IP address = fhq_1x100 or fhq.1×100

7. The miner is now set up, you may turn off or take the PC away. It will not affect the mining.
8. There are two columns in the miner status showing Temp (PCB) and Temp (Chip), which means the temperature of the board and chip respectively. The miner’s highest working temperature is 85 degree Celsius, after which the miner will shut down automatically.


")